GeoDjango
GeoDjango is an included contrib module in Django, but you need to install a few spatial libraries for it to work.
Follow this installation guide.
I'm using PostGIS which is an extension for PostgreSQL and allows you to store geometry objects like the points and polygons we talked about earlier in a database, and perform spatial queries on them.
Setup
If you've got everything for GeoDjango and PostGIS installed, then you're ready to get started.
The code for this project is here.
PostgreSQL + PostGIS
If you're using PostgreSQL, first create a new database for the project with a user and password.
And then start an interactive session and create the PostGIS extensions in your database.
psql your_database_name

CREATE EXTENSION postgis;
CREATE EXTENSION postgis_topology;
Start a new Django project
Let's start by creating a virtualenv for the project.
Install Django and psycopg2, which is a driver that we need to work with PostgreSQL from Python.
Side note: DAE always type psychopg2?
pip install django
pip install psycopg2
As of this post the current Django version is 3.0.2.
Start a new Django project - I called it geodemo.
django-admin startproject geodemo
Next cd into geodemo and create a new app - I called it neighbors.
python manage.py startapp neighbors
Settings.py
Now go to your settings.py file.
Add django.contrib.gis and neighbors(or whatever you named your app) to INSTALLED_APPS.
INSTALLED_APPS = [
    'django.contrib.admin',
    'django.contrib.auth',
    'django.contrib.contenttypes',
    'django.contrib.sessions',
    'django.contrib.messages',
    'django.contrib.staticfiles',
    'django.contrib.gis',
    'neighbors',
]
And update DATABASES with your PostgreSQL username, password, database name, etc, to connect to the database you created earlier.
DATABASES = {
    'default': {
        'ENGINE': 'django.contrib.gis.db.backends.postgis',
        'NAME': your_database_name,
        'USER': your_username,
        'PASSWORD': your_password,
        'HOST':'127.0.0.1'
    }
}
Just to make sure everything is working correctly, go back to the project's root directory and start the Django development server.
python manage.py runserver
If you get any errors, something is probably not configured correctly and you will need to go back and figure out what went wrong.
If no errors, go ahead and run the initial database migrations.
Neighborhood data
Next we will create a Django model for the neighborhood data and then import the data into the database.
But first let's inspect the data so we know what we're working with.
GDAL - Geospatial Data Abstraction Library
If you've set up GeoDjango and installed the geospatial libraries that it requires, you will have the library GDAL.
Inspect the neighborhood data
The command line tool ogrinfo from GDAL is what we will use to inspect the .shp file.
Pass it the filepath to the .shp file in the neighborhood data - mine is in ~/Downloads/NTA/.
ogrinfo ~/Downloads/NTA/geo_export_61339824-ff0c-4002-ae14-c1cd5103949d.shp
The output:
INFO: Open of `geo_export_61339824-ff0c-4002-ae14-c1cd5103949d.shp'
      using driver `ESRI Shapefile' successful.
1: geo_export_61339824-ff0c-4002-ae14-c1cd5103949d (Polygon)
This tells us that:
- There is one layer of Polygon data.
- The layer name is
geo_export_61339824-ff0c-4002-ae14-c1cd5103949d.
Now let's run the command again but this time also passing it the layer name to get more information, which will be used to create the GeoDjango model.
ogrinfo -so ~/Downloads/NTA/geo_export_61339824-ff0c-4002-ae14-c1cd5103949d.shp geo_export_61339824-ff0c-4002-ae14-c1cd5103949d
From the docs, the -so flag tells it to just provide a summary and not list all of the features - the features are each individual polygon/neighborhood.
There are 195 features, which you can see from this output.
INFO: Open of `geo_export_61339824-ff0c-4002-ae14-c1cd5103949d.shp'
      using driver `ESRI Shapefile' successful.

Layer name: geo_export_61339824-ff0c-4002-ae14-c1cd5103949d
Metadata:
  DBF_DATE_LAST_UPDATE=1919-09-06
Geometry: Polygon
Feature Count: 195
Extent: (-74.255591, 40.496115) - (-73.700009, 40.915533)
Layer SRS WKT:
GEOGCS["WGS84(DD)",
    DATUM["WGS84",
        SPHEROID["WGS84",6378137.0,298.257223563]],
    PRIMEM["Greenwich",0.0],
    UNIT["degree",0.017453292519943295],
    AXIS["Geodetic longitude",EAST],
    AXIS["Geodetic latitude",NORTH]]
boro_code: Real (33.31)
boro_name: String (254.0)
county_fip: String (254.0)
ntacode: String (254.0)
ntaname: String (254.0)
shape_area: Real (33.31)
shape_leng: Real (33.31)
Notice the field names such as boro_name for borough name, or ntaname for the neighborhood name, along with their data types - these will be used to generate the model.
Generate the model
You can automatically generate a model from the shapefile with the ogrinspect management command, which inspects the data like we just did and outputs a model based on fields and data types.
Make sure you are in the root directory of your GeoDjango app to run it.
python manage.py ogrinspect ~/Downloads/NTA/geo_export_61339824-ff0c-4002-ae14-c1cd5103949d.shp Neighborhood --srid=4326 --mapping --multi
I will break down the ogrinspect command in a minute, but first take a look at the output.
# This is an auto-generated Django model module created by ogrinspect.
from django.contrib.gis.db import models


class Neighborhoods(models.Model):
    boro_code = models.FloatField()
    boro_name = models.CharField(max_length=254)
    county_fip = models.CharField(max_length=254)
    ntacode = models.CharField(max_length=254)
    ntaname = models.CharField(max_length=254)
    shape_area = models.FloatField()
    shape_leng = models.FloatField()
    geom = models.MultiPolygonField(srid=4326)


# Auto-generated `LayerMapping` dictionary for Neighborhoods model
neighborhoods_mapping = {
    'boro_code': 'boro_code',
    'boro_name': 'boro_name',
    'county_fip': 'county_fip',
    'ntacode': 'ntacode',
    'ntaname': 'ntaname',
    'shape_area': 'shape_area',
    'shape_leng': 'shape_leng',
    'geom': 'MULTIPOLYGON',
}
You can copy and paste this model directly into your models.py.
Note that the models module is imported from django.contrib.gis.db, so you want to copy the import statement as well and delete the django.db import that is in models.py by default.
We will be using the neighborhoods_mapping dictionary in the next section to import the actual data into the database.
The ogrinspect command
python manage.py ogrinspect ~/Downloads/NTA/geo_export_61339824-ff0c-4002-ae14-c1cd5103949d.shp Neighborhood --srid=4326 --mapping --multi
~/Downloads/NTA/geo_export_61339824-ff0c-4002-ae14-c1cd5103949d.shp is the file path where I've downloaded the shapefileNeighborhood is the name of the GeoDjango model- SRID is a spatial reference identifier for a coordinate system, and 4326 indicates the latitude and longitude coordinate system. You can read more here.
- mapping - tells it to generate the
neighborhood_mapping dictionary
- multi - tells it to make the
geom field a MultiPolygonField instead of a regular PolygonField.
A MultiPolygonField is a more general field type than a PolygonField, and according to the docs a MultiPolygonField would accept a Polygon geometry object, but not vice versa.
Apparently shapefiles often include MultiPolygons, so it can be better to use the more general field option.
Run migrations for the Neighborhood model
Run the database migrations to create tables for your new model.
python manage.py makemigrations
python manage.py migrate
Import the neighborhood data
Now we need to import the data itself into the database.
The LayerMapping dictionary that we generated earlier, neighborhood_mapping, maps the fields in the Neighborhood model to the fields that are in the shapefile, and will be used to import the data.
Inside the neighbors app, create a new file load.py.
import os
from django.contrib.gis.utils import LayerMapping
from .models import Neighborhood

# Auto-generated `LayerMapping` dictionary for Neighborhood model
neighborhood_mapping = {
    'boro_code': 'boro_code',
    'boro_name': 'boro_name',
    'county_fip': 'county_fip',
    'ntacode': 'ntacode',
    'ntaname': 'ntaname',
    'shape_area': 'shape_area',
    'shape_leng': 'shape_leng',
    'geom': 'MULTIPOLYGON',
}


neighborhood_shapefile = '/path/to/your/shapefile.shp'

def run(verbose=True):
    layermap = LayerMapping(Neighborhood,neighborhood_shapefile,neighborhood_mapping,transform=False)
    layermap.save(strict=True,verbose=verbose)
We're using the same shapefile as we used earlier, so you need the path to that file in neighborhood_shapefile.
You could keep the shapefile in your project somewhere and use a relative filepath as well.
We've imported LayerMapping which you can read about here, and will be used to extract each neighborhood from the shapefile and save it to the database.
Save the file, and then change directories back to the root directory of your project.
Start up the interactive shell.
And import the load module and run it.
from neighbors import load
load.run()
You should get output similar to this.
Saved: Neighborhood object (1)
Saved: Neighborhood object (2)
Saved: Neighborhood object (3)
...
Saved: Neighborhood object (193)
Saved: Neighborhood object (194)
Saved: Neighborhood object (195)
If you did, then your data was successfully imported, and now we can work with it.
Point in Polygon query filter
To perform a point in polygon search, first you need a point.
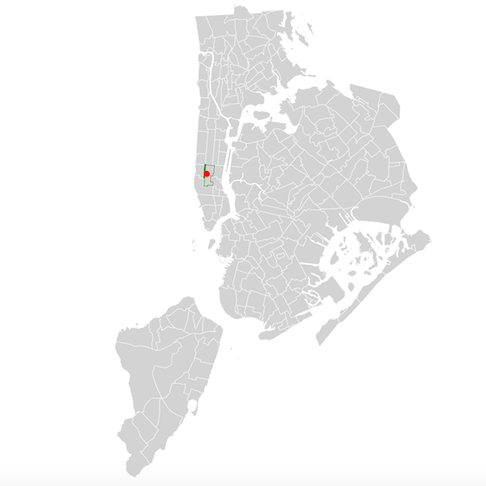
I'm using the point from the earlier example, which is the latitude and longitude coordinate pair for Times Square.
We'll do this in the Django shell interpreter for now, but in a real project it could be part of a view or something like that.
The latitude and longitude for Times Square is -73.9855 and 40.7580 respectively.
from django.contrib.gis.geos import Point
from neighbors.models import Neighborhood

#Times Square lat/lon coordinates
latitude = -73.9855
longitude = 40.7580

pnt = Point(latitude,longitude)

hood = Neighborhood.objects.filter(geom__contains=pnt)
This gives you a queryset of one item, which we can look at and see which neighborhood the point is in.
hood[0].ntaname
'Midtown-Midtown South'
The Point class, comes from another geospatial library that you need in order to use GeoDjango: GEOS, which stands for Geometry Engine Open Source.
You can read about it here.
Let's look at the query.
Neighborhood.objects.filter(geom__contains=pnt)
Recall from earlier that geom is the MultiPolygonField in the Neighborhood model corresponding to the data about the polygon shapes.
Here is the SQL from that query.
print(Neighborhood.objects.filter(geom__contains=pnt).query)

SELECT "neighbors_neighborhood"."id", "neighbors_neighborhood"."boro_code", "neighbors_neighborhood"."boro_name", "neighbors_neighborhood"."county_fip", "neighbors_neighborhood"."ntacode", "neighbors_neighborhood"."ntaname", "neighbors_neighborhood"."shape_area", "neighbors_neighborhood"."shape_leng", "neighbors_neighborhood"."geom"::bytea
FROM "neighbors_neighborhood"
WHERE ST_Contains("neighbors_neighborhood"."geom", ST_GeomFromEWKB('\001\001\000\000 \346\020\000\000P\215\227n\022\177R\300\033/\335$\006aD@'::bytea))
In this query, ST_Contains is the function in PostGIS that computes whether or not a polygon contains the point.
Another way to do this is to check if the polygon intersects with the point.
From the PostGIS docs, if a geometry or geography shares any portion of space then they intersect.
intersecting_hood = Neighborhood.objects.filter(geom__intersects=pnt)

intersecting_hood[0].ntaname
'Midtown-Midtown South'
And the SQL from this query.
print(Neighborhood.objects.filter(geom__intersects=pnt).query)

SELECT "neighbors_neighborhood"."id", "neighbors_neighborhood"."boro_code", "neighbors_neighborhood"."boro_name", "neighbors_neighborhood"."county_fip", "neighbors_neighborhood"."ntacode", "neighbors_neighborhood"."ntaname", "neighbors_neighborhood"."shape_area", "neighbors_neighborhood"."shape_leng", "neighbors_neighborhood"."geom"::bytea
FROM "neighbors_neighborhood"
WHERE ST_Intersects("neighbors_neighborhood"."geom", ST_GeomFromEWKB('\001\001\000\000 \346\020\000\000P\215\227n\022\177R\300\033/\335$\006aD@'::bytea))
This query uses the ST_Intersects function in PostGIS to check if a polygon and a point intersect.
Thanks for reading!
As always if you have any questions or comments, leave them below or reach out to me on Twitter @LVNGD.