Named Entity Recognition is a widely used method of information extraction in Natural Language Processing.
The goal of NER is to label text documents with various named entities such as, but not limited to:
- proper names
- locations
- organizations
- currency names
There are several out-of-the-box options for performing this type of information extraction, including one from Stanford, which is the focus of today's post.
Stanford NER
Stanford NER is a Named Entity Recognizer that is written in Java and is part of Stanford's Core NLP library.
It has pre-trained models in English and a handful of other languages.
You can try it out at http://corenlp.run/.
The Stanford NER tagger is great, but sometimes the text data you're working with is different enough from the text data used to train the out-of-the-box tagger that it might not quite meet your needs.
If you find your self in such a situation - or even if you don't! - then I would like to invite you to walk with me through the steps of creating a custom Stanford NER model.
Download Stanford NER
First you need to download the Stanford NER package, which includes everything you need to train a custom model.
Make sure you have Java installed on your machine.
Training data
The model is trained using supervised learning, which means that we need to give it training data with examples to learn from.
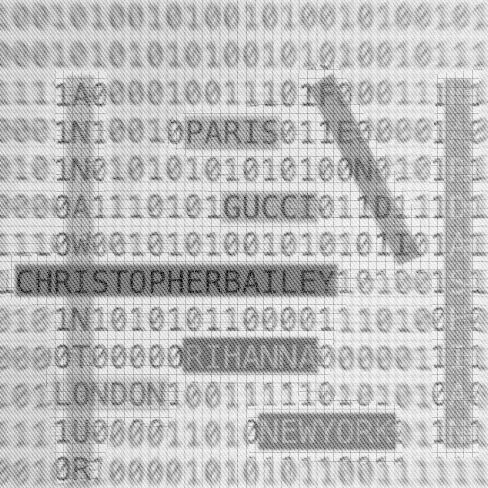
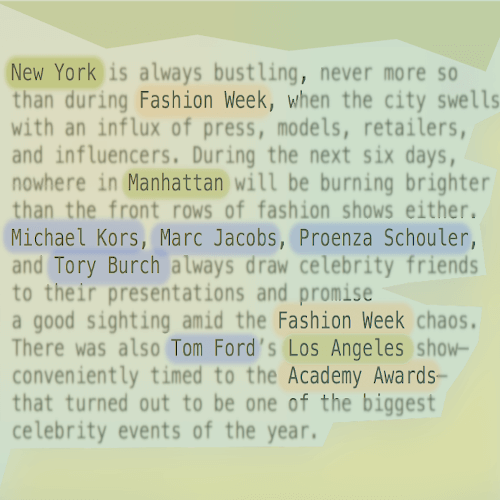
My training data is a bunch of fashion-related articles I've collected from various blogs and other websites, which I've annotated with named entity labels.
This is an ongoing project, so I'm still doing data collection and annotation. Right now I have about 1100 annotated articles.
Documents and Tokens
In NLP a piece of text is usually referred to as a document - in my training data, each article is a document.
A token is a piece of the text document, and the document can be broken up into pieces in different ways depending on your purposes.
In my case, each word is a token.
Tab-separated values
The training data needs to be formatted into tab-separated columns, with one token and its label on each line, separated by a tab.
Kim PERS
K   PERS
attended    O
the O
show    O
alongside   O
her O
hubby   O
and O
Virgil  PERS
's  PERS
very    O
good    O
friend  O
Kanye   PERS
West    PERS
The tokens will either be labeled with a named entity label, such as PERS, or they will have a background label of O, which just means unlabeled.
Each document should be separated by a blank line in the training data file.
Formatting the raw text data
You can either annotate your data by hand or with a service, it just needs to be in the format above for the classifier to be able to parse it.
If you're annotating by hand, there are a couple of scripts available from Stanford to convert the text data into TSV format, with labels initialized to O.
Kim O
K   O
attended    O
the O
show    O
alongside   O
her O
hubby   O
and O
Virgil  O
's  O
very    O
good    O
friend  O
Kanye   O
West    O
Then you can go through and annotate the tokens with appropriate labels by hand.
Step 1: Tokenize
First convert the text to the form of one token per line with the PTBTokenizer from Stanford NLP, using the following command.
java -cp /Users/christina/Projects/stanford_nlp/stanford-ner-2018-10-16/stanford-ner.jar edu.stanford.nlp.process.PTBTokenizer ner_training_data.txt > ner_training.tok
My raw text data is in ner_training_data.txt and is just the text of each article separated by a blank line.
The output is a new file, ner_training.tok, with one token on each line.
Step 2: Initialize the labels to O
Run this command to initialize each token with the label O.
perl -ne 'chomp; print "$_\tO\n"' ner_training.tok > ner_training.tsv
This command takes the file ner_training.tok that was created from the first command, and creates a TSV(tab-separated values) file with the initialized training labels.
Initializing the training labels just makes it a little less time-consuming to annotate with the rest of the training labels, because most of the tokens will have the background O label.
You can read more about formatting the data here.
As you label the data, make sure that you don't add extra spaces or tabs or anything like that to the TSV file, which could cause parsing errors when you try to train the model.
Set aside some data for testing
It's always a good idea to split up your data into a training and a testing dataset, and test the model with data that has not been used to train it.
Properties file
Next you need a properties file where you can define parameters like the location of the training data, where to save the new model, how the model should learn, and any features you want to specify.
Here is my properties file, ner_training.prop.
trainFile = annotated_tokens_for_ner.tsv

serializeTo = ner-model.ser.gz

map = word=0,answer=1

maxLeft=1

useClassFeature=true
useWord=true
useNGrams=true
useWordTag=true
useWordPairs=true
useShapeConjunctions=True
useSymTags=True
useGazettes=true
noMidNGrams=true
usePrev=true
useNext=true
useDisjunctive=true
useSequences=true
usePrevSequences=true
useOccurrencePatterns=true
useTypeSeqs=true
useTypeSeqs2=true
useTypeySequences=true
wordShape=chris2useLC
The parameters here are:
- trainFile - the file path of the training file.
- serializeTo - the file path where the finished model should be saved
- map - tells the parser that the first column(starting from zero) is the token and the second is the label
The rest are features that you can read more about in the documentation for the NERFeatureFactory class.
Training the model
Now that the data has been labeled and is in the correct format, it's time to train the model.
Train the model with the following command.
java -cp /Users/christina/Projects/stanford_nlp/stanford-ner-2018-10-16/stanford-ner.jar edu.stanford.nlp.ie.crf.CRFClassifier -prop ner_training.prop
If you get any memory errors, check out the docs for help on those.
CRFClassifier
The new model will be trained with a Conditional Random Field classifier, using the CRFClassifier class from Stanford NLP.
Documentation for the CRFClassifier.
If you want to read up on Conditional Random Fields(CRF) check out this paper.
NERFeatureFactory
This class creates the features from the training data that will be used to train the new model, which we defined in the properties file from above.
Documentation for the NERFeatureFactory class.
Testing the model
Once your model has finished training, you can test it out.
The testing data should be in the same tab-separated values format with labels as the training data.
java -cp /Users/christina/Projects/stanford_nlp/stanford-ner-2018-10-16/stanford-ner.jar edu.stanford.nlp.ie.crf.CRFClassifier -loadClassifier ner-model.ser.gz -testFile annotated_tokens_for_ner_test.tsv
This command loads the classifier we just trained ner-model.ser.gz and runs our test file annotated_tokens_for_ner_test.tsv against it.
CRFClassifier tagged 27628 words in 23 documents at 11285.95 words per second.
         Entity P   R   F1  TP   FP     FN
         ENTITY 0.8822  0.7830  0.8296  891 119 247
         Totals 0.8822  0.7830  0.8296  891 119 247
Here the precision is 88.22% and the recall is 78.30%.
I have a discussion of the metrics in this post where I've used scikit-learn, but the metrics are the same.
I'm still collecting and annotating training data, so this definitely isn't a final model, and I might look into tuning some of the parameters in the properties file as well.
Information about all of the parameters can be found in the documentation for the NERFeatureFactory class.
Thanks for reading!
Now it's time to go try this out with your own data.
Recap
- We took raw text data and processed it into tab-separated values(TSV) format, with each token and its label per line.
- Then trained the model with the CRFClassifier from Stanford NLP.
- Tested the trained model with testing data that was kept separate from the training data.
Let me know if you've trained a custom NER model with your own data and how it worked out!
If you have any questions or comments, please write them below or reach out to me on Twitter @LVNGD.