If you've used the bucket fill tool in a paint or photo editing program like Photoshop or Gimp, then you already have first-hand experience with the flood fill algorithm.
I'm going to demonstrate it with this image of a sweatshirt that keeps coming up in my targeted ads.
The algorithm works on a multi-dimensional array, such as a 2-D matrix of pixels that make up an image.
It takes a starting point in the array.
Then it finds all of the other adjacent nodes that are connected to it based on some measure of similarity.
With the bucket tool, you select an area of an image and then click somewhere within the selection to fill it in.
The starting point is where you clicked.
After you click, the algorithm moves out in all directions from that point, and traverses a path of of pixels that have a similar color to the starting point.
When it runs into a pixel that is not similarly colored to the starting pixel, it stops pursuing that path.
The similarly colored pixels will be updated or filled in with whatever color you chose.
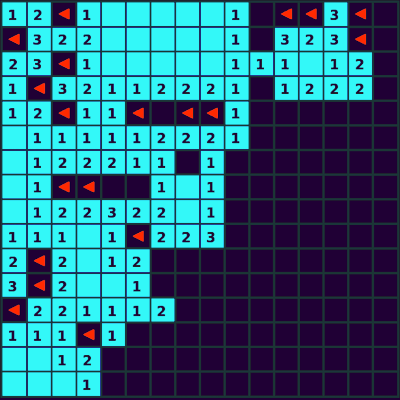
Flood fill is also used in games like Minesweeper to determine which squares to clear from the board when you click on one.
Flood fill in action
Now pretend like we've opened the image in your favorite photo editing software, and made a selection - the black dashed ellipse is our "selection" area.
Then click in the middle of the cat, which is black, so the algorithm traversed the neighboring areas until it ran into pixels that were not a similar color.
The bucket tool would either keep going until it ran into different colored pixels, or the bounds of the selection area.
You can see that the orange parts of the sweatshirt were not changed, and the gray flecks of fur were also not changed.
If you're designing the algorithm, it's up to you to decide on what similar colors means, which we will get into later.
The algorithm
There are three inputs to the flood fill algorithm.
The starting point.
The pixel color of the starting point.
The color to update the connected pixels to.
From the word traverse you may have gathered that this is a graph problem.
The graph is the 2-D matrix of pixels.
Each pixel is a cell in the matrix, and a node in the graph.
There are edges between nodes that are connected to the starting point.
Graph traversal
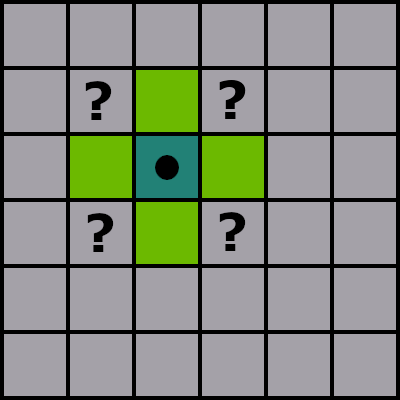
In a matrix, each cell has four neighbors on the top, bottom, left and right.
You will need to decide if you also want to traverse diagonal neighbors of each pixel.
Since this is a graph problem, you can use any of the graph traversal classics like breadth-first search or depth-first search to solve it.
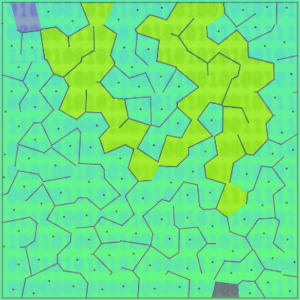
Depth-first search
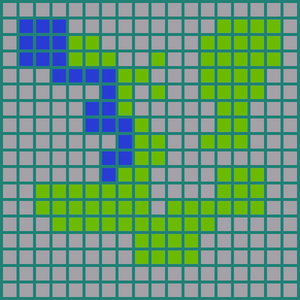
Here I'm using depth-first search, and including the diagonal neighbors.
The starting point is marked with an X.
You can pretend that we are using a photo editing program and clicked on this spot in the image.
def flood_recursive(matrix):
    width = len(matrix)
    height = len(matrix[0])
    def fill(x,y,start_color,color_to_update):
        #if the square is not the same color as the starting point
        if matrix[x][y] != start_color:
            return
        #if the square is not the new color
        elif matrix[x][y] == color_to_update:
            return
        else:
            #update the color of the current square to the replacement color
            matrix[x][y] = color_to_update
            neighbors = [(x-1,y),(x+1,y),(x-1,y-1),(x+1,y+1),(x-1,y+1),(x+1,y-1),(x,y-1),(x,y+1)]
            for n in neighbors:
                if 0 <= n[0] <= width-1 and 0 <= n[1] <= height-1:
                    fill(n[0],n[1],start_color,color_to_update)
    #pick a random starting point
    start_x = random.randint(0,width-1)
    start_y = random.randint(0,height-1)
    start_color = matrix[start_x][start_y]
    fill(start_x,start_y,start_color,9)
    return matrix
This is the same code used to create the animation, and the colors correspond to numbers, so color_to_update is initialized to 9, which is mapped to the gray color that the connected pixels are updated to.
With depth-first search, the algorithm explores one path completely until reaching a pixel with a different color.
Then it comes back to the starting point and pursues the next neighbor's path.
Notice that only the dark blue pixels that are connected are changed. The other dark blue pixels that are not adjacent to the starting point are left alone.
With this example the colors are all uniform, so we just have to compare pixels to see if they have an equal value.
But with a real image like the sweatshirt, it is not so simple.
Colors are not uniform in many (most?) images
If you look closely at the orange sweatshirt in the image earlier, you can see that there are many different shades of orange that make up even just the sweatshirt part of the image.
There are lighter and darker shades of orange due to lighting, shadows, creases, etc.
Two pixels right next to each other might be slightly different shades of orange, but look the same to our human eyes.
So we need to be more flexible and instead check to see if the colors are similar.
How can we tell if two colors are similar?
We are working with RGB colors.
An RGB color has a red, green and blue parameter, which together combine to create all other colors.
Each parameter has a value between 0 and 255, which defines the intensity of that color parameter.
An example would be rgb(242, 103, 51), which is one of the shades of orange found in the sweatshirt.
So colors are on a spectrum, and instead of checking for an exact match, we could compare a new pixel color to the starting point, and decide if they are close enough of a match.
One way to compare two colors would be to subtract the red, green and blue values of the colors separately and see if all of them are within a certain threshold.
def is_similar(start_color, new_color):
    threshold = 40
    red,green,blue,alpha = start_color
    new_red,new_green,new_blue,new_alpha = new_color
    if abs(red-new_red) <= threshold and abs(green-new_green) <= threshold and abs(blue-new_blue) <= threshold:
        return True
    return False
In this function I've set a threshold of 40, so if the absolute value of the difference between each of the red, green and blue values in the two colors is greater than or equal to 40, then they are similar enough.
Side note: the image is actually an RGBA image, where the A represents an alpha channel for opacity, but we are only concerned with the red, green and blue values here.
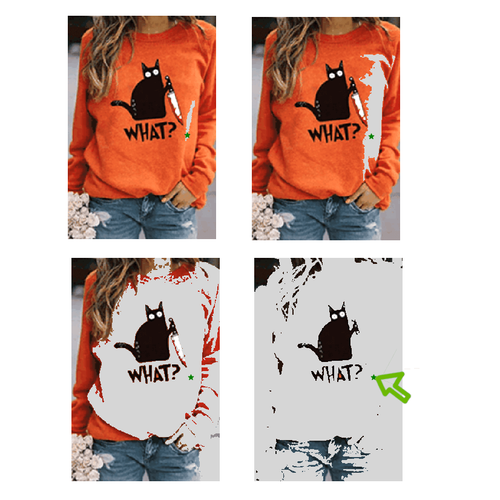
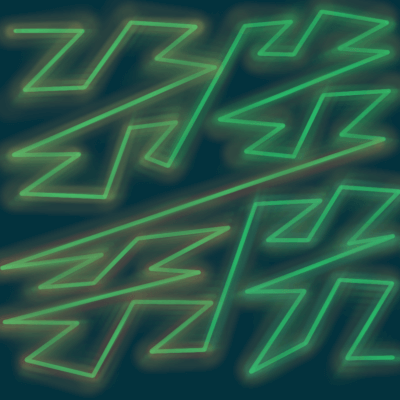
Here you can see the difference between thresholds.
Top left = threshold 10
Top right = threshold 40
Bottom left = threshold 100
Bottom right = threshold 200
There is a green star on each image that shows where the starting point is.
The green arrow on the bottom right points it out as well, in case it's not easy to see!
It makes sense because with a large threshold like 200, we are defining almost all other RGB colors as similar.
Interview questions about islands
Another use for this algorithm is in interview questions that ask about islands.
If they want you to count all the islands in a matrix or something like that, which seems to be a popular interview question.
You can use the flood fill algorithm to determine the nodes that belong to each island.
Implementations
As the saying goes, don't reinvent the wheel!
There are implementations of the flood fill algorithm that have been tested and are probably a better choice than rolling your own solution.
Starting out with general purpose computing on the GPU, we are going to write a WebGPU compute shader to compute Morton Codes from an array of 3-D coordinates. This is the first step to detecting collisions between pairs of points.
In this post, I am dipping my toes into the world of compute shaders in WebGPU. This is the first of a series on building a particle simulation with collision detection using the GPU.
Finding the Lowest Common Ancestor of a pair of nodes in a tree can be helpful in a variety of problems in areas such as information retrieval, where it is used with suffix trees for string matching. Read on for the basics of this in Python.